Real Estate AI Workflow
How to Prep a Listing with AI in Seconds
I started using AI on listing photos for one simple reason: a room can feel good in person and still look flat, dark, and awkward online. With a decent source photo, AI can make the same space feel brighter, cleaner, and easier to picture living in—fast.
What actually works is not “making the property look better than it is.” It’s making the room read better. Better light, better furniture balance, less visual noise, a neutral style, and a few believable versions for different channels.
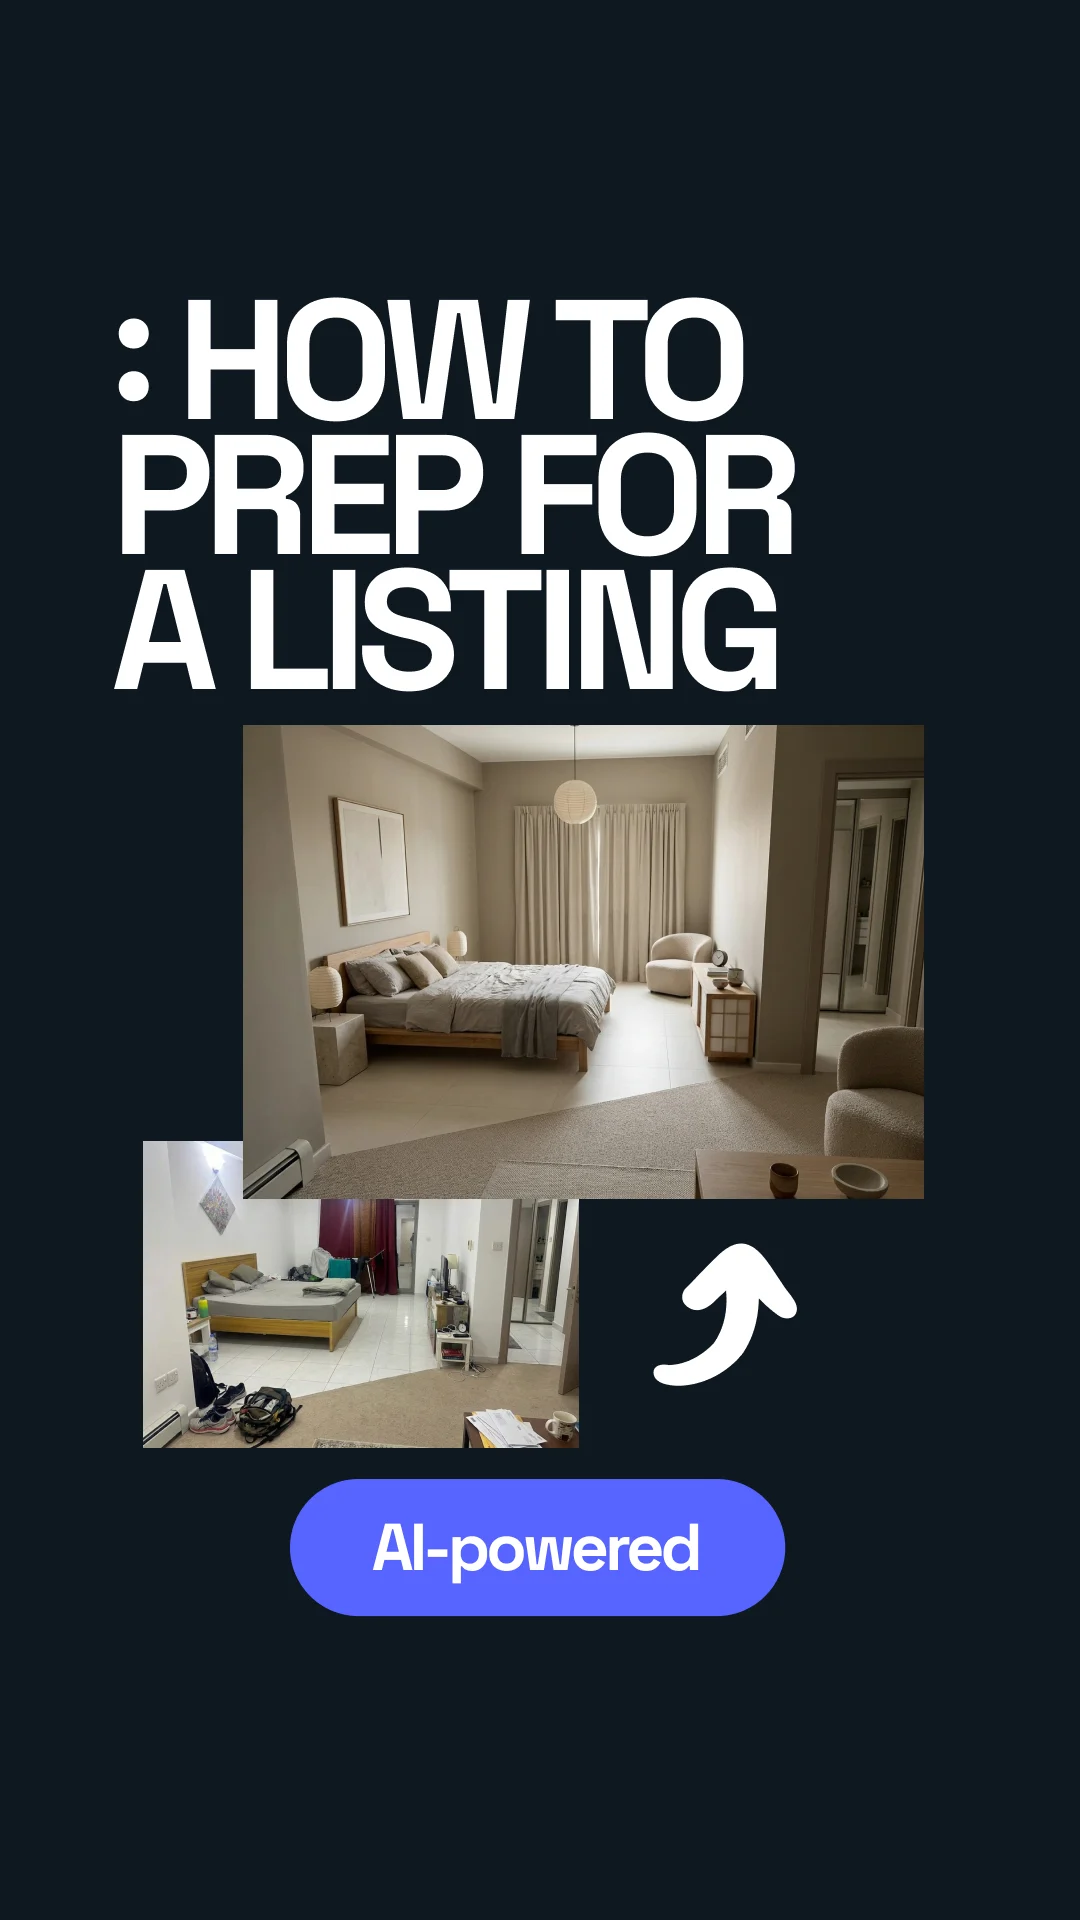


Transformed with AI by Uniify
The core idea
The first time I used AI on a listing photo, I wasn’t trying to be clever. I just had a living room shot that looked worse than the real space. Good windows. Decent floor. Totally fine room. But in the photo it felt dark, cramped, and forgettable. I ran it through an AI staging tool, and in under a minute the same room looked brighter, calmer, and much easier to sell.
The rule I learned pretty quickly: use AI to improve the first impression, not to rewrite the property. Keep the walls, windows, doors, layout, and condition honest. Fix the presentation. Don’t fake the facts.567
The simple workflow
Good source photo → pick a neutral style → reduce clutter → stage lightly → improve light → make 2–3 versions → publish the one that still feels real.
What this workflow actually does
This method uses AI to virtually stage and clean up a real room photo. When it works, it usually improves three things at once:
- Layout: the room feels easier to read because the furniture makes more sense.
- Lighting: the image feels brighter, softer, and more inviting.
- Style: everything looks like it belongs together instead of fighting for attention.
The part that matters most is what you tell the tool not to touch: keep the architecture the same, keep the room size believable, keep the materials realistic, and don’t turn the photo into some fantasy showroom.
What AI usually helps with
- Making a room feel more finished
- Testing a few staging directions fast
- Modernizing dated interiors visually
- Creating different versions for listings, ads, and rentals
What AI still gets wrong
- Exact furniture scale
- Very messy source photos
- Rooms with mirrors and tricky geometry
- Anything that crosses into misleading advertising
Why it works for listings
Once I started doing this more often, the pattern got obvious. Buyers do not spend long trying to “decode” a room online. They either get the space fast, or they move on. That lines up with the industry data too. NAR’s 2025 Profile of Home Staging says 83% of buyers’ agents reported that staging made it easier for buyers to visualize a property as their future home, and NAR’s related 2025 release says 29% of agents saw staged homes receive a 1% to 10% increase in dollar value offered while 49% of sellers’ agents observed reduced time on market.12
The online part matters just as much. Zillow says 79% of recent home buyers shopped online to find their home, and that nearly half of buyers who purchased in the prior 12 months said professional photos were extremely or very important to their home-buying experience.3 Zillow also says its Showcase listings with high-resolution images, 3D tours, and interactive floor plans sold for 2% more than similar homes, which is another way of saying stronger media helps listings perform better online.4
The same logic shows up in short-term rentals. Airbnb’s own photography guidance recommends bright, natural light and images that feel real rather than overdone.8
The real job of the image: not “make this room look expensive.” It’s “make this room easy to understand in three seconds.”
How to shoot the source photo
My first real mistake was thinking AI could save a bad photo. It can help a decent photo. It does not magically fix a dark, crooked, cluttered one. The faster win is usually improving the input before you touch the tool.
1. Keep the lines straight
Zillow recommends shooting at chest height and watching distorted verticals. That sounds basic, but it matters a lot. Slightly crooked rooms often turn into fake-looking AI results.3
2. Use natural light
I get better results almost every time when the room already has daylight. Airbnb says bright, natural light feels more inviting, and that tracks with what actually works in listings.8
3. Remove the obvious mess first
If the frame is full of random stuff, the model starts guessing. Laundry, cables, pet bowls, bags, and small clutter make the result worse fast.
My basic capture checklist looks like this:
- Use a real room photo, not a render.
- Show enough of the room to understand what it is.
- Leave visible floor area so placement makes sense.
- Open curtains or blinds if that helps naturally.
- Avoid super-wide distortion unless you know how to correct it.
Step-by-step listing-prep workflow
1. Start with the goal, not the style
This helped me a lot. Before picking “Scandinavian” or “Japandi” or anything else, decide what the image is for. Main listing photo, Airbnb thumbnail, ad creative, social post—those are not the same job. A main listing image usually needs to feel neutral and spacious first.
2. Lock the architecture
I now say this almost every time: keep walls, windows, doors, ceiling height, floor plan, and permanent fixtures unchanged. That one line prevents a lot of nonsense.
3. Pick a style that helps the room
Another early mistake: choosing a style that looked cool instead of one that made the property easier to sell. Bold design can be fun, but for most listings neutral wins. Light woods, warm whites, soft contrast, simple furniture, not too much decor.
4. Ask for space, not “more stuff”
I used to over-prompt individual objects. Big mistake. That often leads to clutter. Better prompts ask for outcomes: more openness, better flow, fewer pieces, cleaner surfaces, believable daylight.
5. Make a few versions
I almost never trust the first result now. Usually I make three:
- Version A: clean, neutral, safest for the main listing
- Version B: a warmer lifestyle version
- Version C: a slightly more premium look
6. Do the “would this annoy a buyer?” check
This is the one that keeps you honest. Does the room still look like the actual property? Does it feel improved instead of invented? Would someone show up and feel tricked? If the answer is yes, the image is too far gone.
What stays fixed and what can move
Keep fixed: walls, windows, floor plan, built-ins, views, and anything material to the property.
Change carefully: loose furniture, decor amount, light mood, textiles, and overall styling.
Prompt formulas that get cleaner results
Most bad outputs I’ve seen were not really “AI problems.” They were vague prompt problems. The tool needs three things: the job, the guardrails, and the style direction.
Basic listing prompt
Prepare this room for a real estate listing. Keep the architecture unchanged. Improve lighting, reduce visual clutter, use a clean modern style, and arrange furniture for better openness and flow.
Neutral Scandinavian version
Optimize this living room for a property listing. Preserve walls, windows, floor plan, and permanent fixtures. Make it bright, spacious, and neutral in a Scandinavian style with light wood, soft textiles, simple decor, and realistic daylight.
Japandi version
Virtually stage this room for sale in a calm Japandi style. Keep the room geometry unchanged. Use fewer, well-scaled furniture pieces, warm neutrals, natural wood, soft daylight, and minimal decor that feels premium but believable.
Luxury version
Upgrade this interior for a premium real estate listing. Preserve the architecture. Add elegant contemporary furniture, subtle texture, restrained styling, and soft natural lighting. The result should feel upscale, spacious, and still realistic.
One line that saves a lot of bad results: add this at the end—do not change room structure, do not add windows, do not exaggerate size, do not create surreal or editorial styling.
Which styles convert better
I learned this slower than I should have: the best-looking version is often not the best-performing version. In most markets, the styles that convert best are the ones that cause the least friction.
Usually strong for listings
- Scandinavian
- Japandi
- Warm minimal
- Clean contemporary
Usually risky
- Heavy maximalism
- Very dark palettes
- Moody editorial luxury
- Trend-heavy decor that dates quickly
Why neutral usually works better:
- It helps more buyers picture themselves there.
- It makes rooms feel cleaner and larger.
- It keeps attention on the property, not the styling.
- It travels better across listing sites, ads, and rental platforms.

What must stay truthful
This is the part people love to skip, but it matters. NAR states that REALTORS® have a duty under Articles 2 and 12 to disclose digitally altered or staged images to avoid misrepresentation, and NAR’s current Code of Ethics says Internet content and images must not produce a deceptive or misleading result.57
NAR has also been talking more openly about scrutiny around altered real-estate imagery, and the FTC’s general rule is simple enough: digital advertising still cannot be unfair or deceptive.69 So yes, stage the room. Relight it a bit. Clean it up. Just don’t remove meaningful defects or imply the property is something it is not.
Usually safer edits
- Virtual staging in empty or lightly furnished rooms
- Believable relighting
- Removing loose clutter
- Basic color, crop, and exposure fixes
Edits that get risky fast
- Removing stains, cracks, or damage that matter
- Adding architectural features that do not exist
- Changing the real view from the windows
- Making unfinished work look complete
The practical policy: label virtually staged or digitally altered photos clearly, keep the original files, and check your MLS, brokerage, and local rules before publishing.569
Common mistakes that make AI listing images look fake
1. Starting with a dark or crooked photo
I still see this all the time. The tool tries to compensate, and the result ends up with muddy corners, strange shadows, or furniture that feels slightly melted.
2. Styling for social instead of for the listing
Another easy mistake. A dramatic image might get attention, but if the buyer has to work hard to understand the room, it is doing the wrong job.
3. Overfurnishing a small room
I’ve done this too. You ask for “cozy,” and suddenly every corner is filled. Small rooms nearly always do better with fewer, larger pieces and more breathing room.
4. Using only one variation
The first output is often just the draft. Sometimes the cleanest version wins. Sometimes the slightly warmer one does. You do not really know until you compare them side by side.
5. Forgetting the truth check
If the buyer shows up and feels like the photo oversold the room, the image did not help. It may have gotten the click, but it also created disappointment.
When it works best—and when it fails
Best use cases
- Vacant or under-furnished listings
- Dated rooms that need a visual refresh
- Rental and Airbnb image updates
- Quick A/B testing of staging directions
- Investor, flip, and pre-renovation marketing
Where it tends to struggle
- Very cluttered or damaged rooms
- Low-resolution old listing photos
- Mirror-heavy spaces and odd angles
- Ultra-luxury listings where every detail is inspected
- Anything requiring exact dimensional accuracy
Using Uniify.Space for this workflow
If you want to run this process in one place, Uniify.Space is positioned as an AI platform for creating interior and exterior design variations from uploaded photos, with features that fit this exact use case: restyling, furniture or clutter removal, relighting, and fast visual variations from the same original image.10
The way I’d use a tool like this is simple: upload the room photo, start with a restrained style, lock the architecture, generate three versions, and keep the one that feels the most believable. Uniify’s terms also say you should only upload images you own or have permission to modify, and not upload images containing people without consent.11
Simple starting point: on uniify.space, try one neutral version first, then a warmer lifestyle version, then a slightly more premium one—all from the same source photo.10
FAQ
Can AI staging be used in real estate listings?
Yes, but it should help the presentation, not change the facts. Keep the property truthful, avoid hiding important defects, and disclose altered or virtually staged photos where required.579
What kind of source photo gives the best result?
A real photo with straight lines, enough visible floor, clean framing, and natural light. In practice, those four things matter more than fancy styling.38
Which styles are safest for broad buyer appeal?
Usually Scandinavian, Japandi, warm minimal, and clean contemporary. They read as calm, neutral, and easy to imagine living in.
Should you make more than one version?
Usually yes. One neutral version, one warmer version, and one slightly more premium version is a practical setup.
Does AI replace physical staging?
No. It is the fast, flexible option. Physical staging still wins when exact scale, premium detail, or in-person showing impact matters most.5
References
- National Association of REALTORS®, Profile of Home Staging (2025) — staging made it easier for buyers to visualize the property, according to 83% of buyers’ agents.
- National Association of REALTORS®, NAR Report Reveals Home Staging Boosts Sale Prices and Reduces Time on Market — 29% reported a 1% to 10% increase in dollar value offered; 49% observed faster sales.
- Zillow, Real Estate Photography Tips for Home Sellers — online shopping behavior, importance of professional photos, straight verticals, chest-height framing, and sunny-day guidance.
- Zillow, 14 Tips for Selling Your Home Fast and for More Money — “screen appeal” and the reported 2% premium for Zillow Showcase listings with richer media packages.
- National Association of REALTORS®, Generative AI Is Your Ally for Smart Staging, Faster Deals — NAR reminder that REALTORS® should disclose digitally altered or staged images under Articles 2 and 12.
- National Association of REALTORS®, Are You ‘Catfishing’ Buyers With Picture-Perfect Real Estate Photos? — recent discussion of disclosure expectations and scrutiny around altered listing photos.
- National Association of REALTORS®, 2026 Code of Ethics & Standards of Practice — misleading images and deceptive results are prohibited in Internet content and advertising.
- Airbnb, Experiences Best Practices: Photography and Copy — bright, natural light and authentic imagery guidance.
- Federal Trade Commission, .com Disclosures: How to Make Effective Disclosures in Digital Advertising — online advertising remains subject to prohibitions on unfair or deceptive acts or practices.
- Uniify.Space, Official product site — current positioning and feature presentation for photo-based interior and exterior variations.
- Uniify.Space, Privacy & Terms — upload-permission, consent, and usage terms.